Curriculum
- 2 Sections
- 7 Lessons
- Lifetime
Expand all sectionsCollapse all sections
- Day 1: Conversion MachineThis section focuses on day 1’s learning. This includes working on Conversion Machine sites and pages, common scenarios that come up, and other important nuances.7
- Day 2: Gravity FormsThis section focuses on day 2’s learning. This includes working with Gravity Forms and our typical best practices when in comes to forms.6
Form Notifications & Confirmations
Overview
Now, wrapping up our training on forms, we will be covering some important information around:
- Form settings
- Confirmation messages vs pages
- Form notifications
- Admin vs user notification settings
- Settings we do not want to use
Form Settings
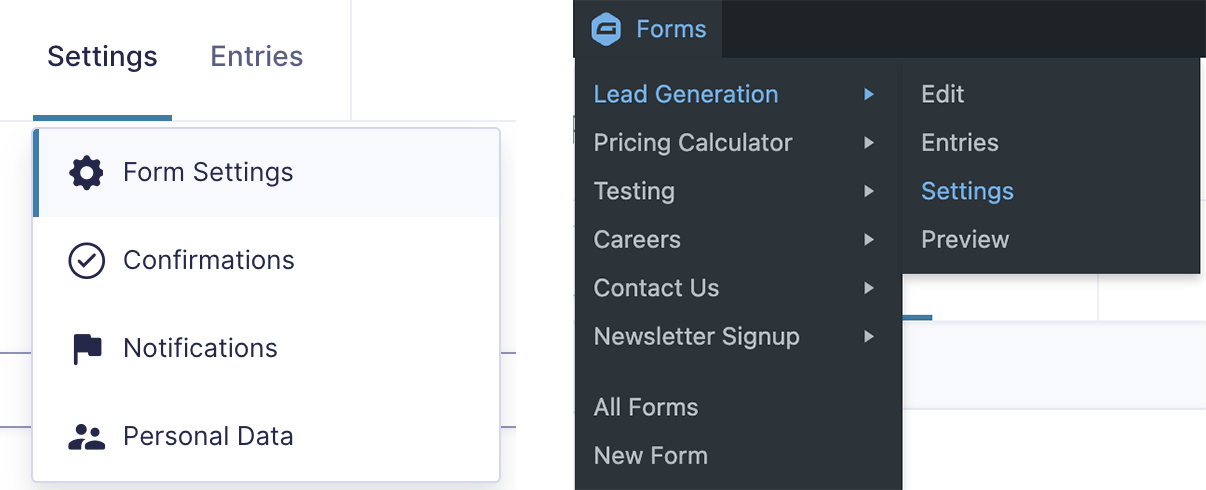
You can navigate to the form settings for a particular form via the admin bar dropdown, hover over the form, and select Settings, or from the Edit form page by hovering over Settings and selecting Form Settings.
Generally speaking, all you need to modify is the form title, to ensure it’s keep accurate to the proper CTA and goals of the form.
Modifying Form Settings

This section is used primarily to update minor options to help style the overall form field look.
Our default settings include:
Form Title
Request a Quote, Book a Consultation, Careers – this typically matches the page name, primary CTA, or other descriptive element that is used to communicate which form the notification is coming from.
Description Placement
Our default is to set this as Below inputs, unless it begins to interfere with the sub-label placement.
Sub-Label Placement
Our default is to set this as Below inputs.
Required Field Indicator
We most often set this to Asterisk, though if a client asks or we feel it would work better, we can switch this to Text :(Required)
🚨 Don’t forget:
Always press Save Settings!
Confirmations
There are 3 types of form confirmations we use: Page and Text are most frequent, with Redirect being used on an as-needed basis.
We do not typically create complex or conditional confirmations unless the client has a particularly complex experience, or is otherwise expecting users to receive a different experience based on their form inputs, making this part of the build generally painless to implement.
Page Confirmations

A confirmation set to the type ‘Page’ will take a user to the set page once their form submission has gone through successfully.
We do not, by default, build out conditional logic or pass data via query strings, as we do not typically direct a user to a page or location that would require another form to be populated, or otherwise feature data that they just filled out on the page.
While there is the potential for future personalization and enhancements, this is not an immediate priority.
🚨 Don’t forget:
If you delete the thank you page assigned for any reason, you will need to re-assign the page afterwards, or create a new page.
Text Confirmations
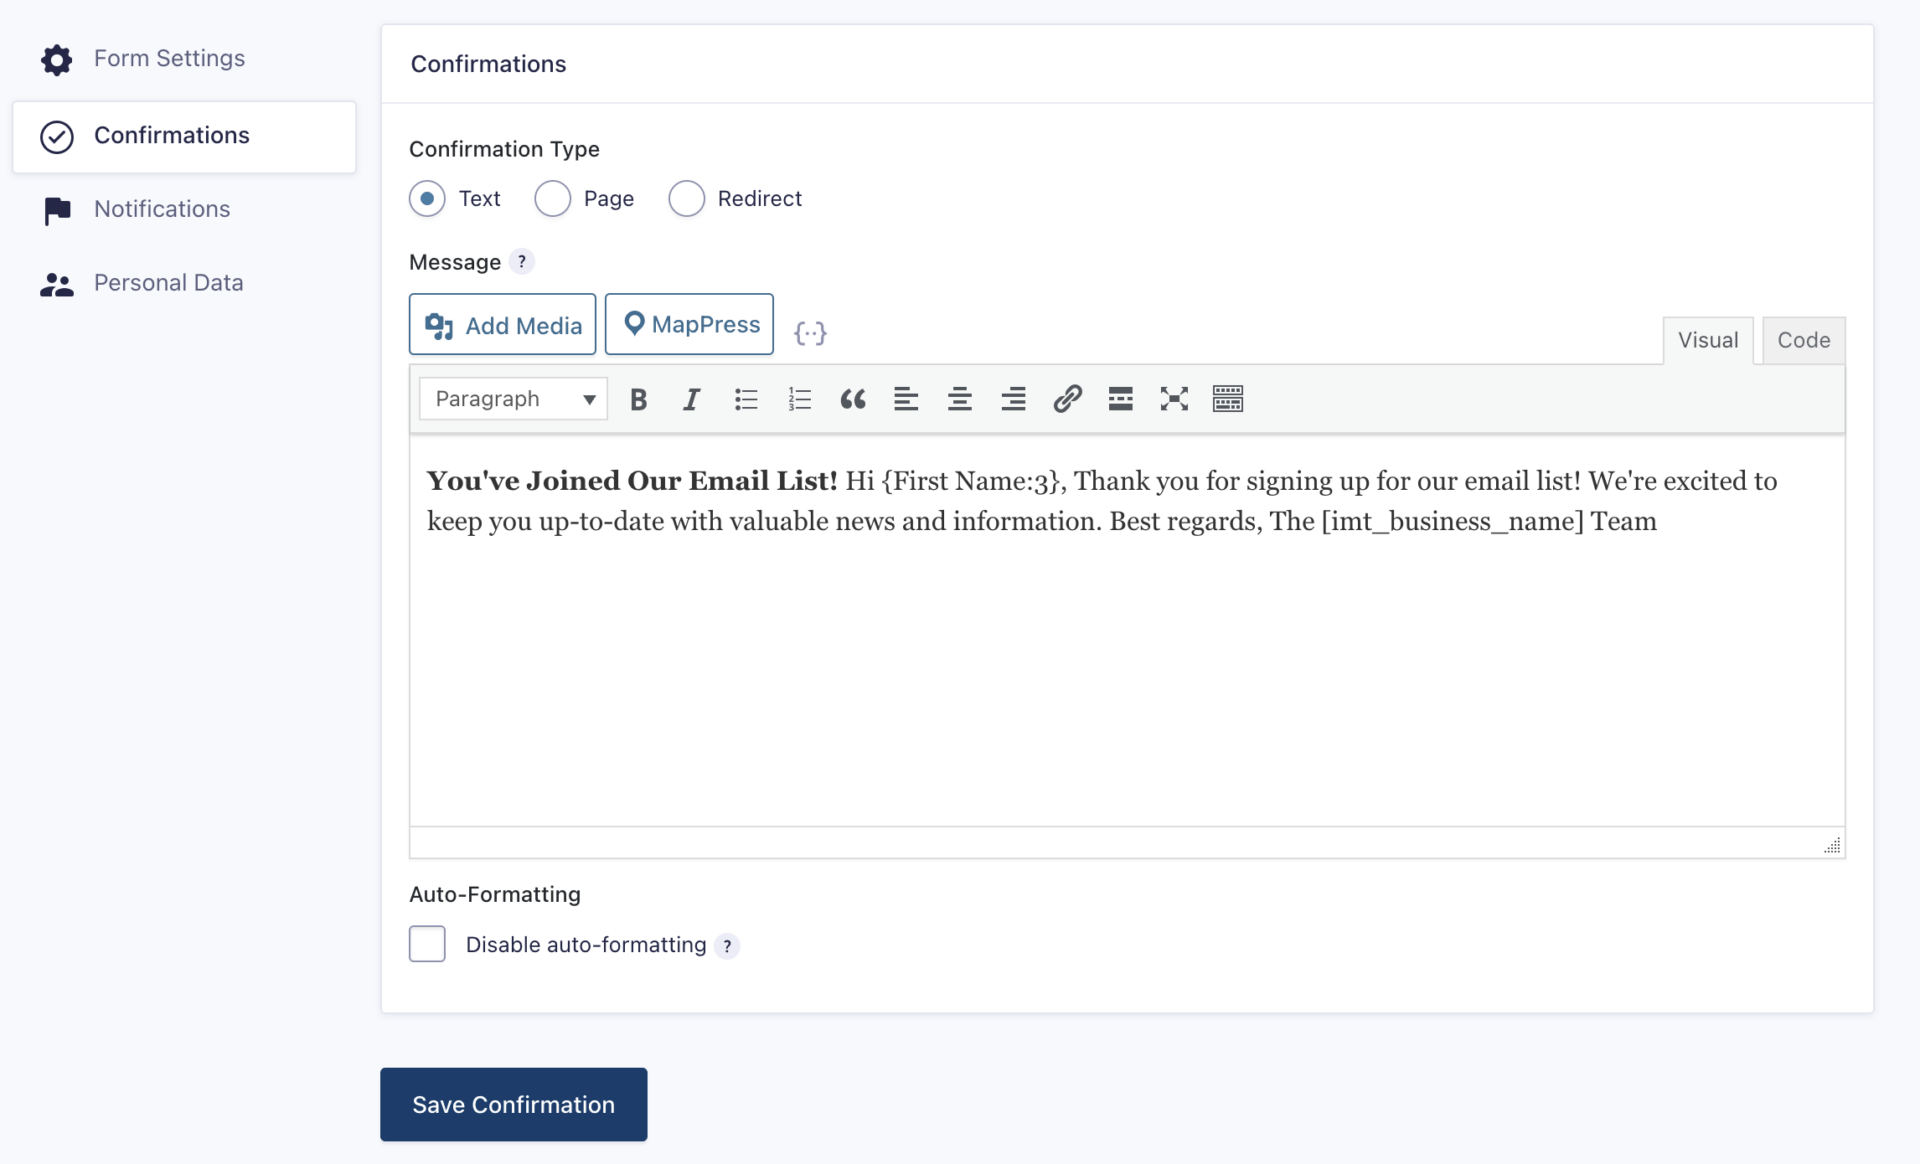
A confirmation set to the type ‘Text’ will replace the form in it’s location with the message set. You see this most commonly with our Newsletter in the footer. Setting up the confirmation this way better allows you to use the user’s data, such as their name, to personalize the message they are shown on submission.
Shortcodes will also work in this context, saving time and typos.
Redirect Confirmations
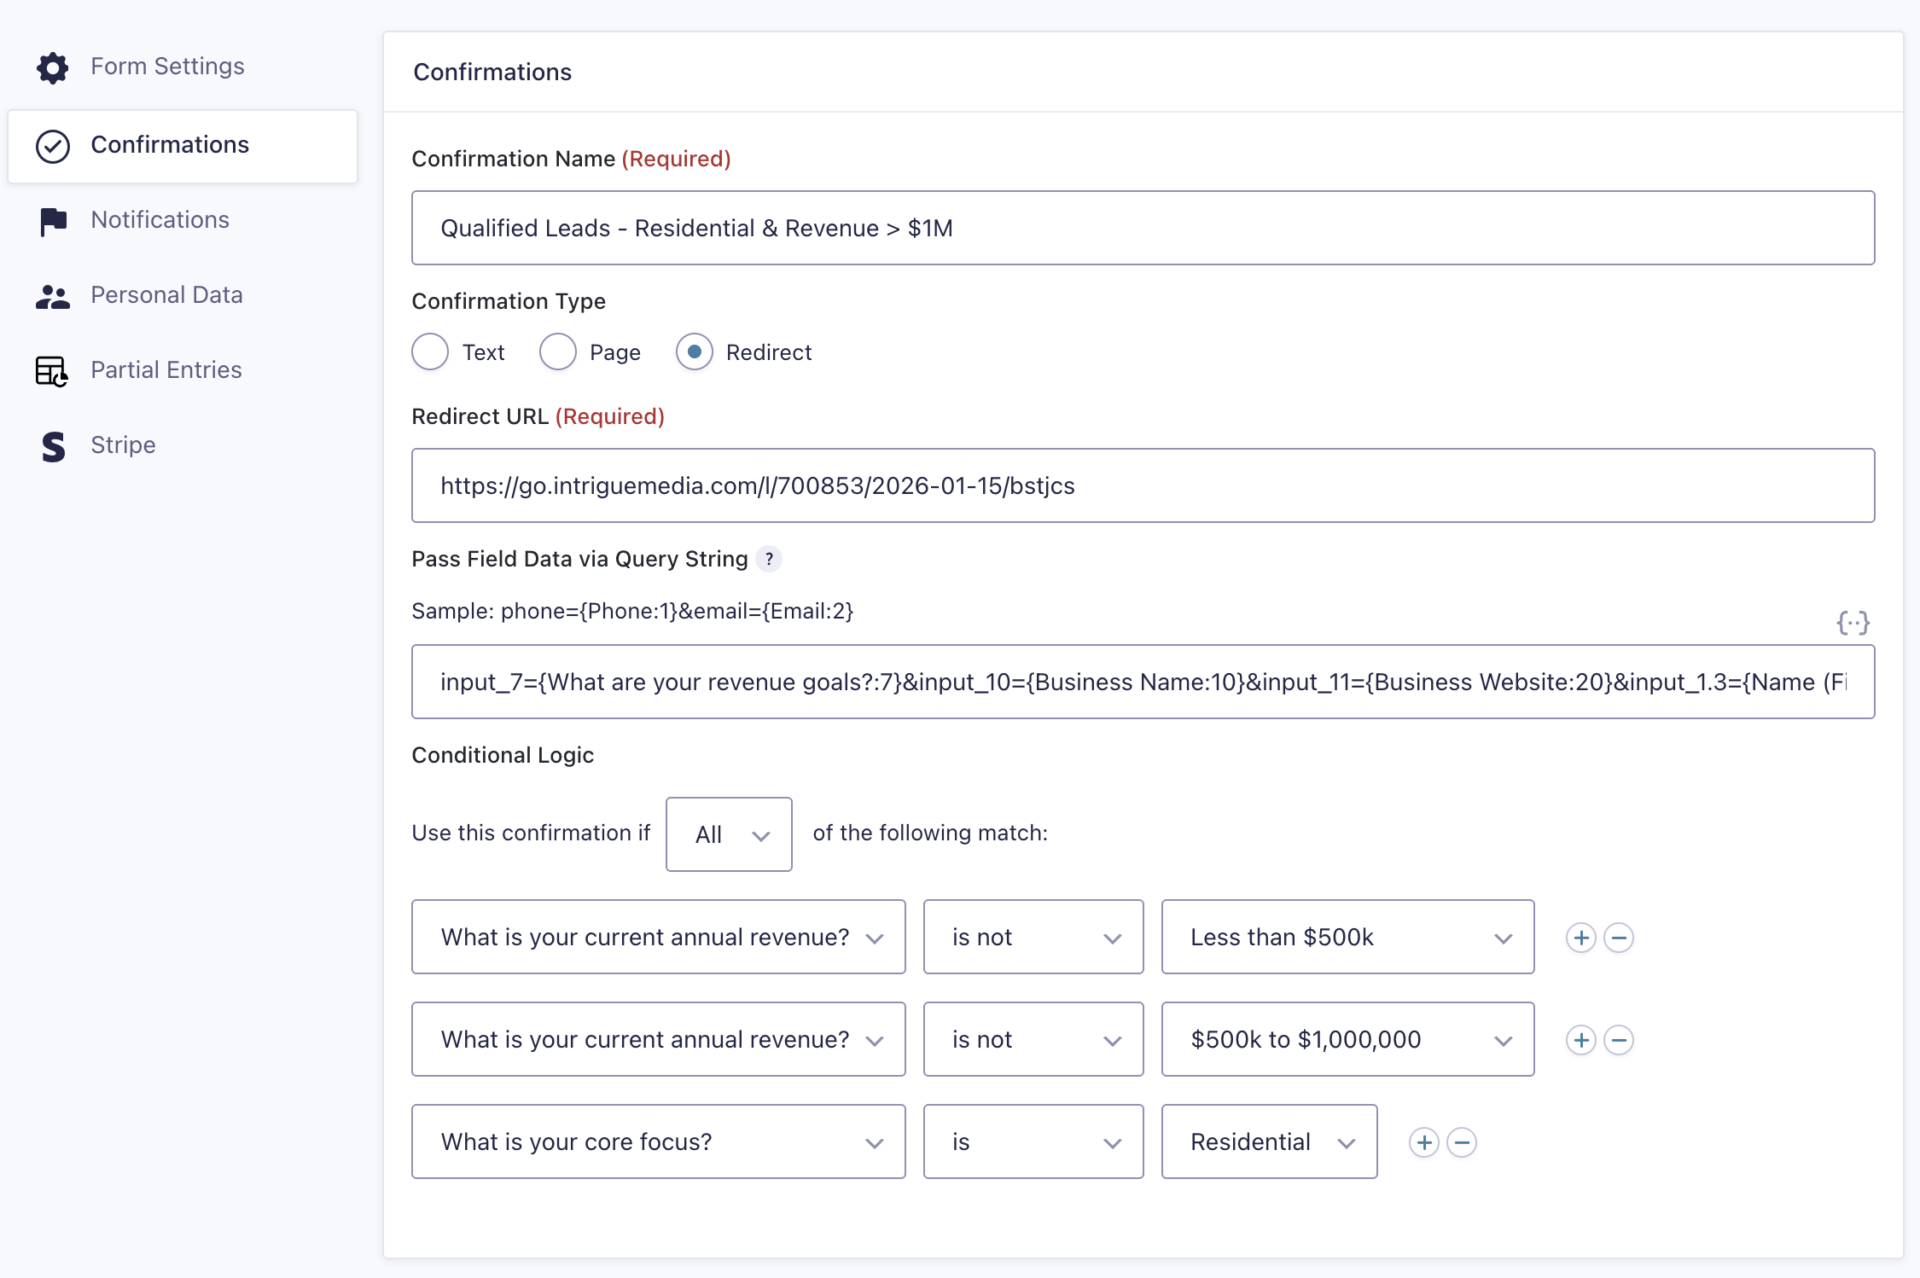
A confirmation set to the type ‘Redirect’ is generally used when after a form is submitted, we need to take a user to something off of our current site. The Intrigue site is a great example of multiple things:
- Setting the redirect URL
- Conditional logic for the redirect to trigger
- Passing field data to the form on the redirected page
🚨 Don’t forget:
If you don’t think something is working the way you expect, asking someone on the team to take a look can be beneficial to help catch and better explain what may be happening.
Notifications
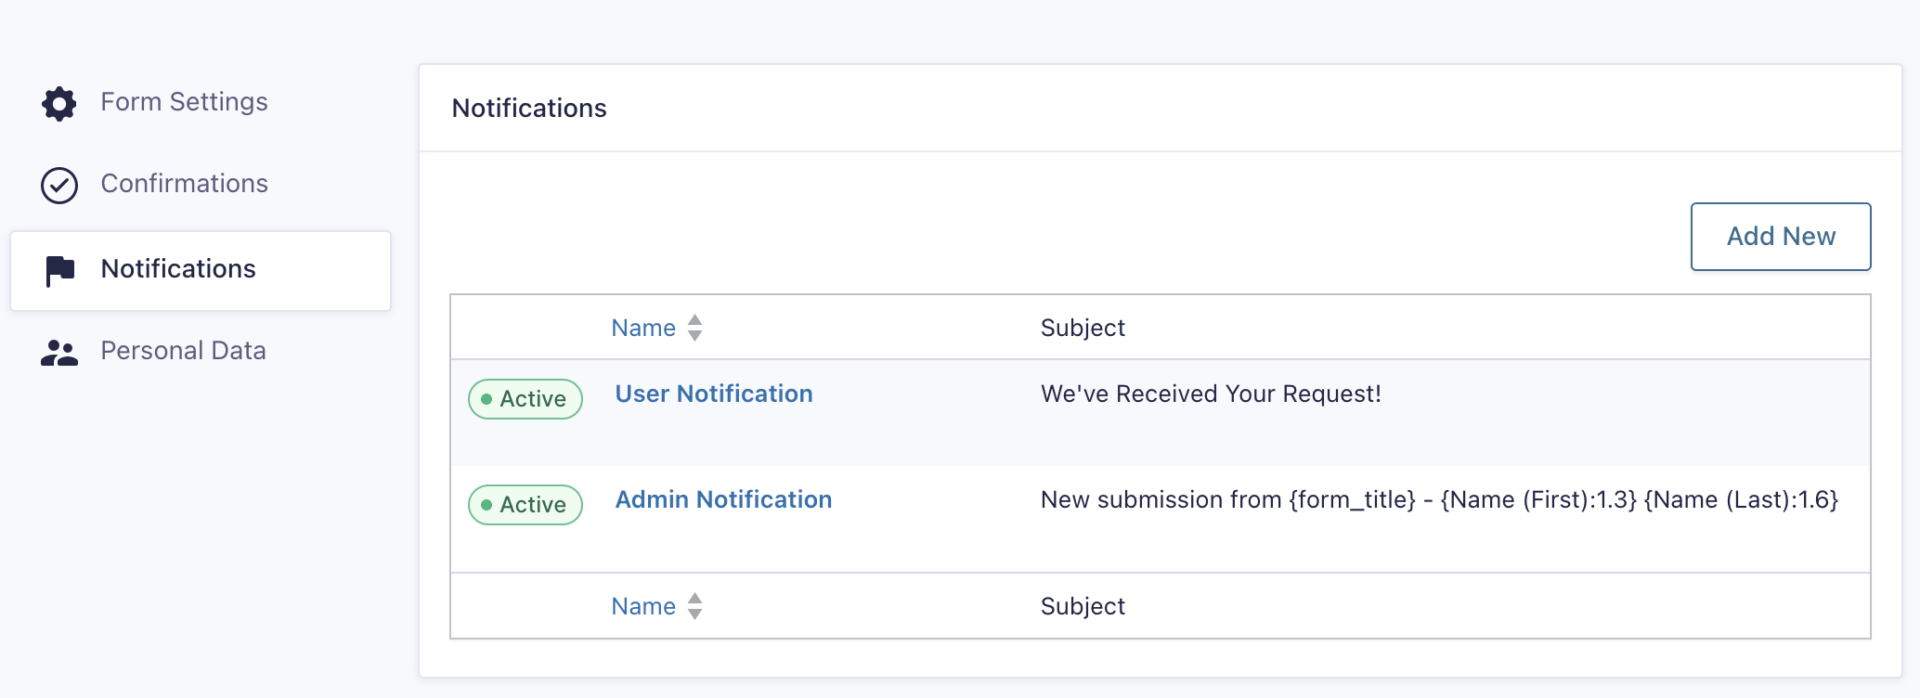
There are 2 primary notifications we use, the User notification and the Admin notification.
The User notification goes to the user who successfully submitted the form.
The Admin notification goes to the admin email(s) set up for the notifcation that a new user made a submission.
🚨 Mandatory Fields
Send To
This will either be the client’s admin email (admin notifications), or be confirmed to be accurately set to the Email address field for User notifications.
From Name
Without a From Name, emails will show as coming from the From Email, which is never great. Typically, we set this to the client’s business name, to keep it organized as the subject line has the user the submission is coming from. Personalize, humanize, organize.
From Email
See further down notes for our process for From Email, we use WP SMTP settings during the Mailgun set up now 🙂
Reply To
Without a Reply To (email) set, users will be unable to communicate with the sender if they need to. This is also generally an info@domain.com email, but sometimes clients wish for it to be a specific individual’s email.
Subject
With no subject, you’ll see the lovely (no subject), which will likely flag your business as suspicious.
Message
The message should always have data, and include the form submission details
User Notifications
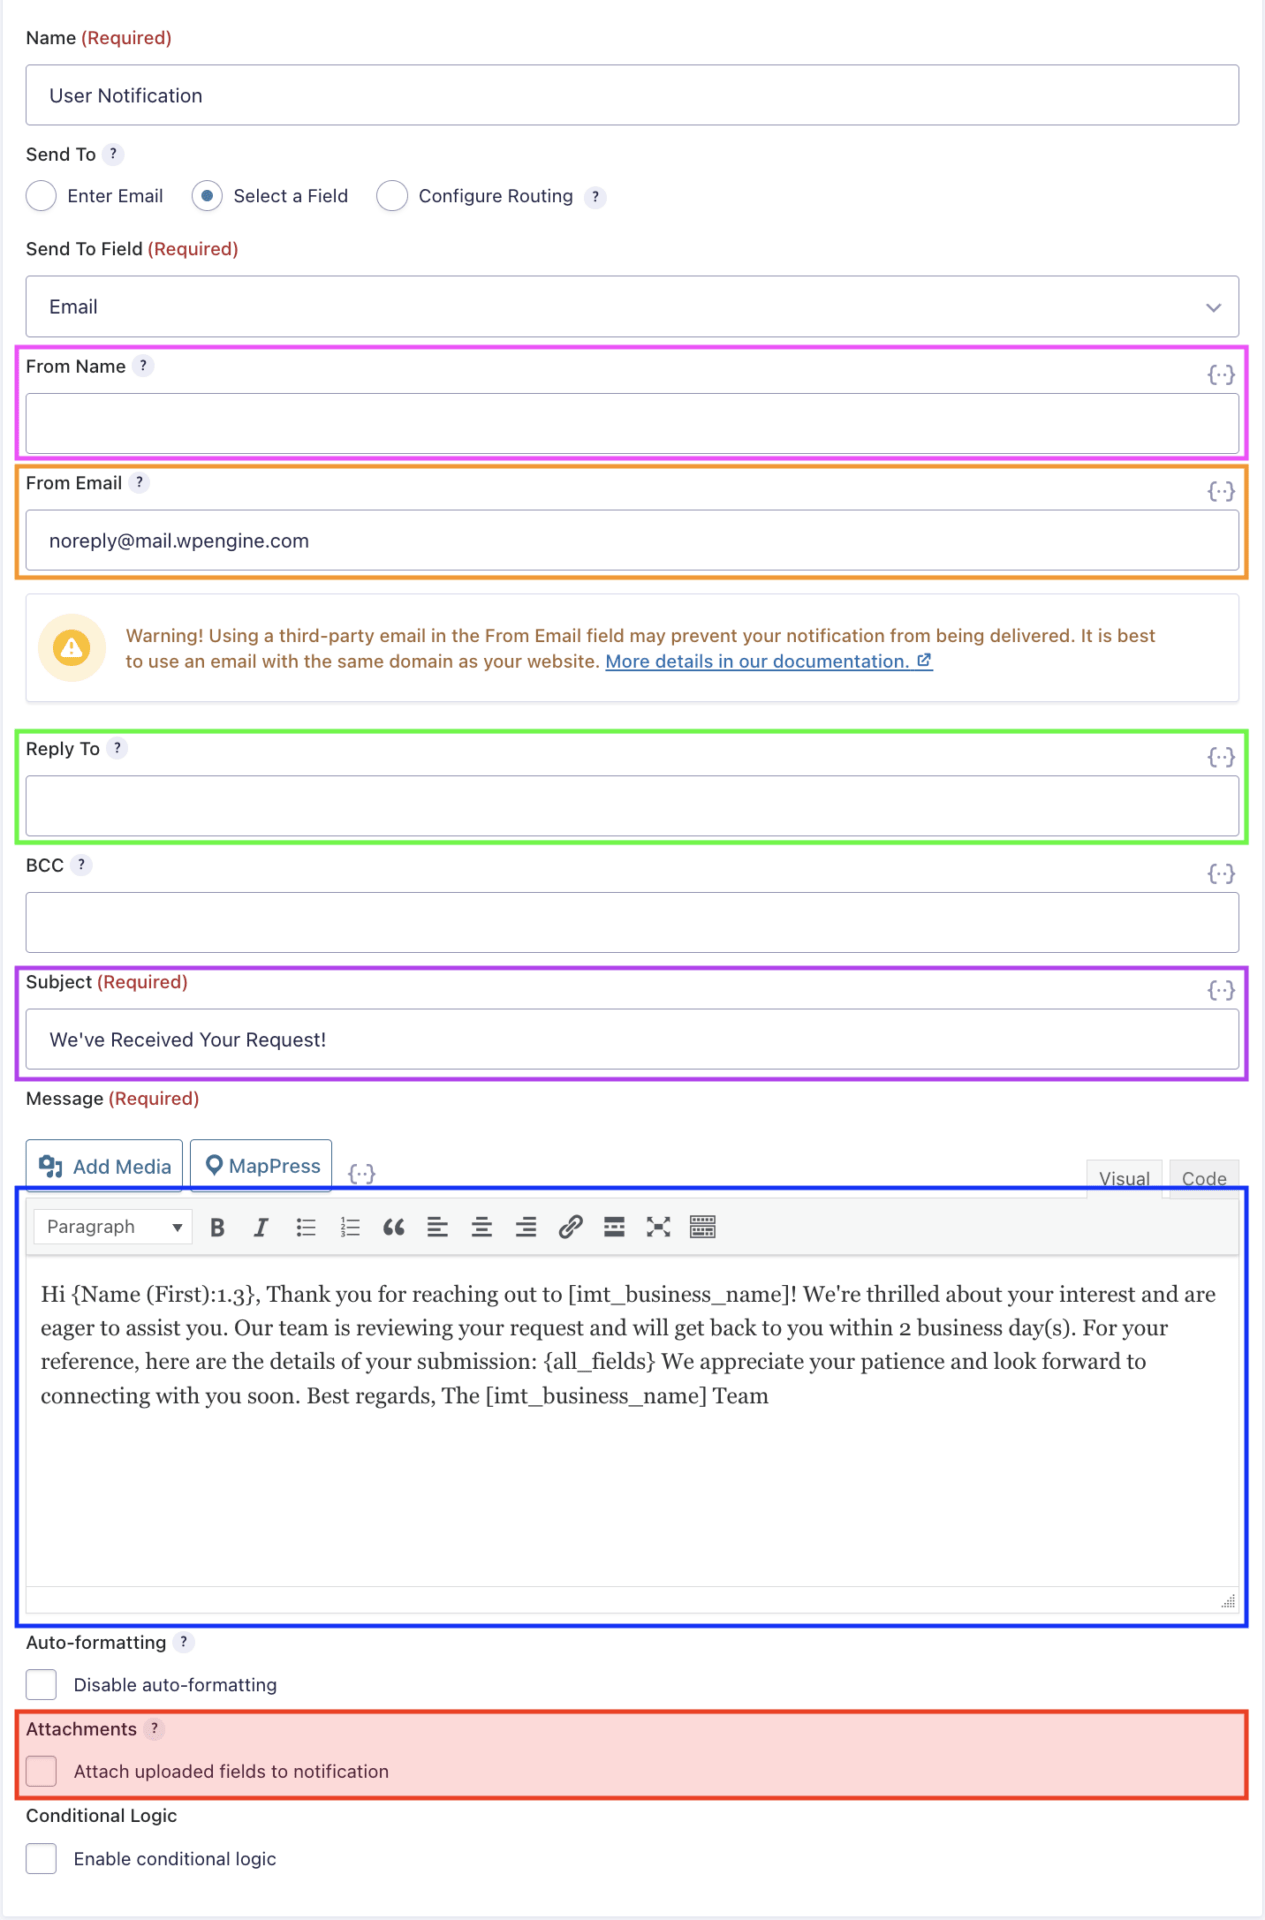
This notification is sent to the user when they submit the form.
YELLOW: The send to email should always be updated to match the form’s email field, to ensure whichever email the user submitted is what it is sent to. It’s best practice to re-set this each time, in case the field’s id changed.
PINK: The from name is typically the client’s business name, or whichever was captured during the lead session. (Rob from Intrigue, Intrigue, etc.)
ORANGE: In most cases, this does not need to be specified as we handle the from name via the WP SMTP setup with Mailgun.
GREEN: The Reply To email should always be set to the approved client email address as indicated.
PURPLE-PINK: The Subject has a default value, but can be adjusted to better suit the client’s tone, brand, and other characteristics of the form which may mean this requires changes.
BLUE: The Message field also has a default value, which can often require small adjustments to suit the client’s expected reply timeframe, brand, tone, or other adjustments.
🚨 Why We Don’t Set The From Email
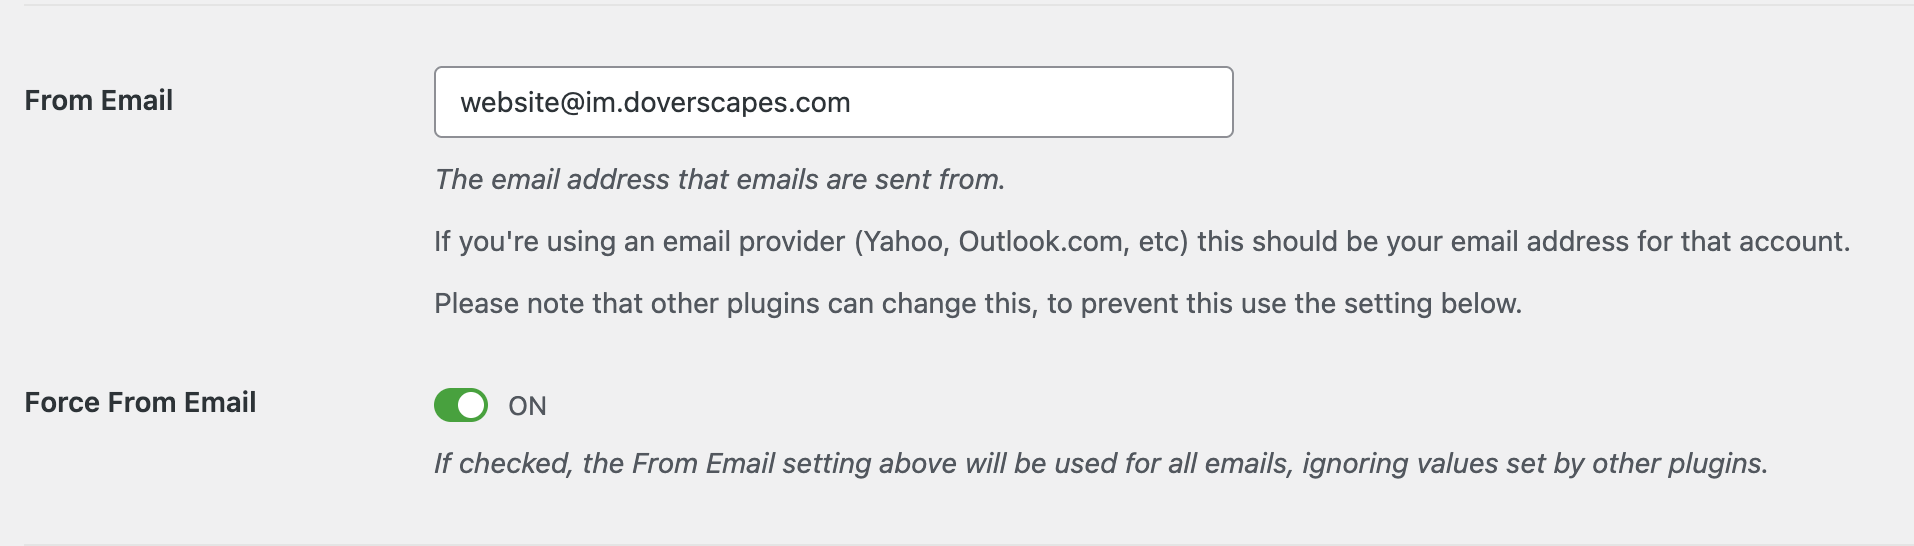
The From Email in most cases does not require any updates, as during the WP SMTP setup, the developer on the build will have configured the email used for all form notifications, and checked ‘yes’ on ‘Force From Email’ which ensures that all of our emails have a usable @im.domain.com from email.
Claire recently shared a really good blog that goes into more detail on this topic, and explains it really well as to why we recommend this approach.
In the event a client requests a unique from email per form, please loop in the developer on the build to correctly configure.
Contact your build team’s developer.
Admin Notifications
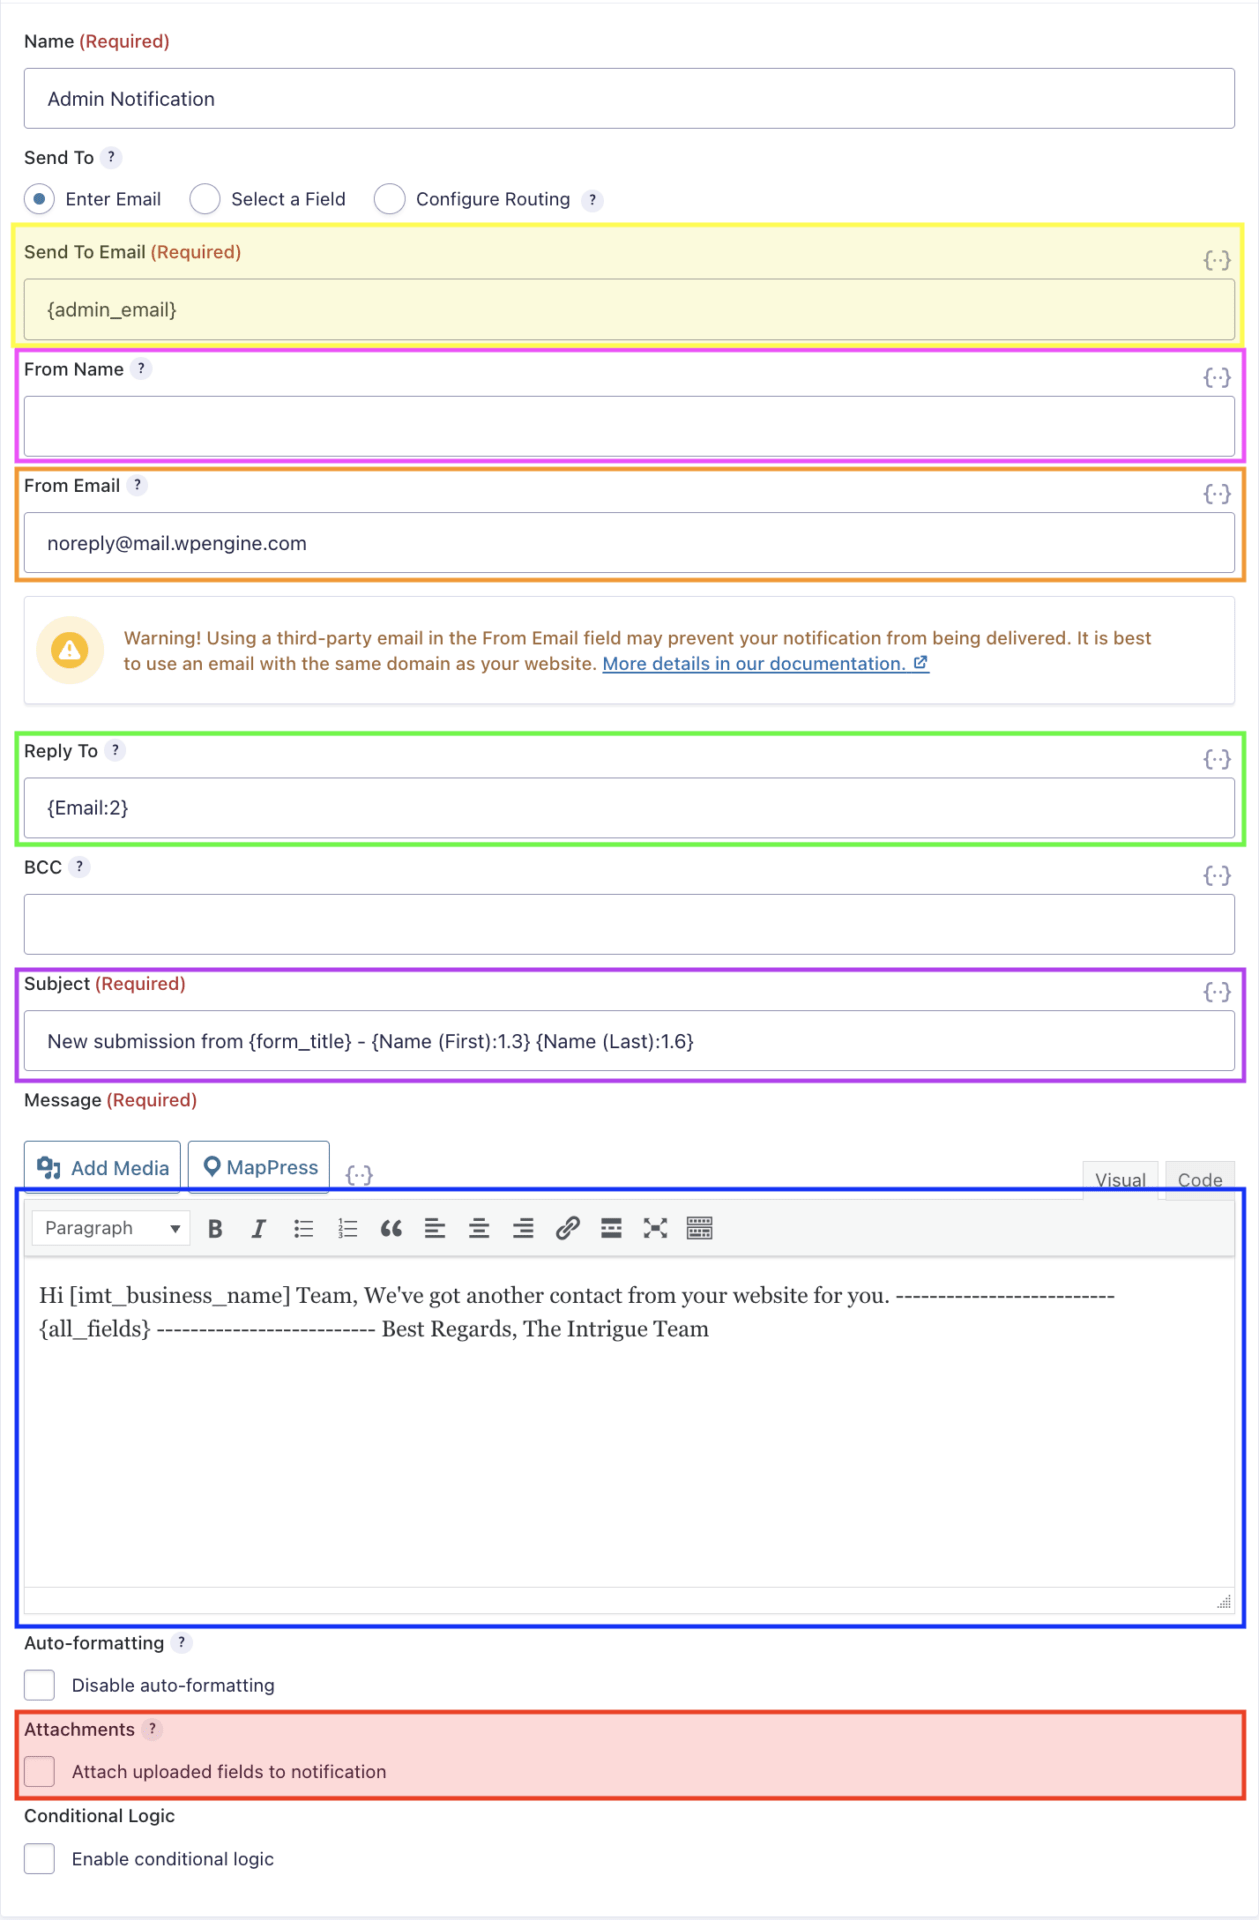
This is the admin notification the client receives when a user submits the form.
Remember to always replace {admin_email} with the client’s email address for the notification, e.g. careers@company.com
YELLOW: The Send To Email MUST be updated to the client’s expected notification email(s) and should never be set to {admin_email} to send admin notifications.
PINK: The from name is typically the client’s business name to remain consistent, but if desired can be set to the name submitted on the form. Generally, using the client’s business name creates a cleaner experience in that the admin would be able to quickly see that this was a form submission from their own website, vs a direct inquiry.
ORANGE: In most cases, this does not need to be specified as we handle the from name via the WP SMTP setup with Mailgun.
GREEN: The Reply To email should always be set to email address field from the form. It’s good practice to reassign the variable, in case the form field id associated to the email field is different for this form.
PURPLE-PINK: The Subject has a default value which does not typically change. It’s good practice to reassign the variables, in case the form field ids have changed. The Subject line is where we generally make use of the user’s first and last name to keep it distinct from other submissions.
BLUE: The Message field also has a default value, which can often require small adjustments to suit the client’s expected reply timeframe, brand, tone, or other adjustments.
🚨 Attachments
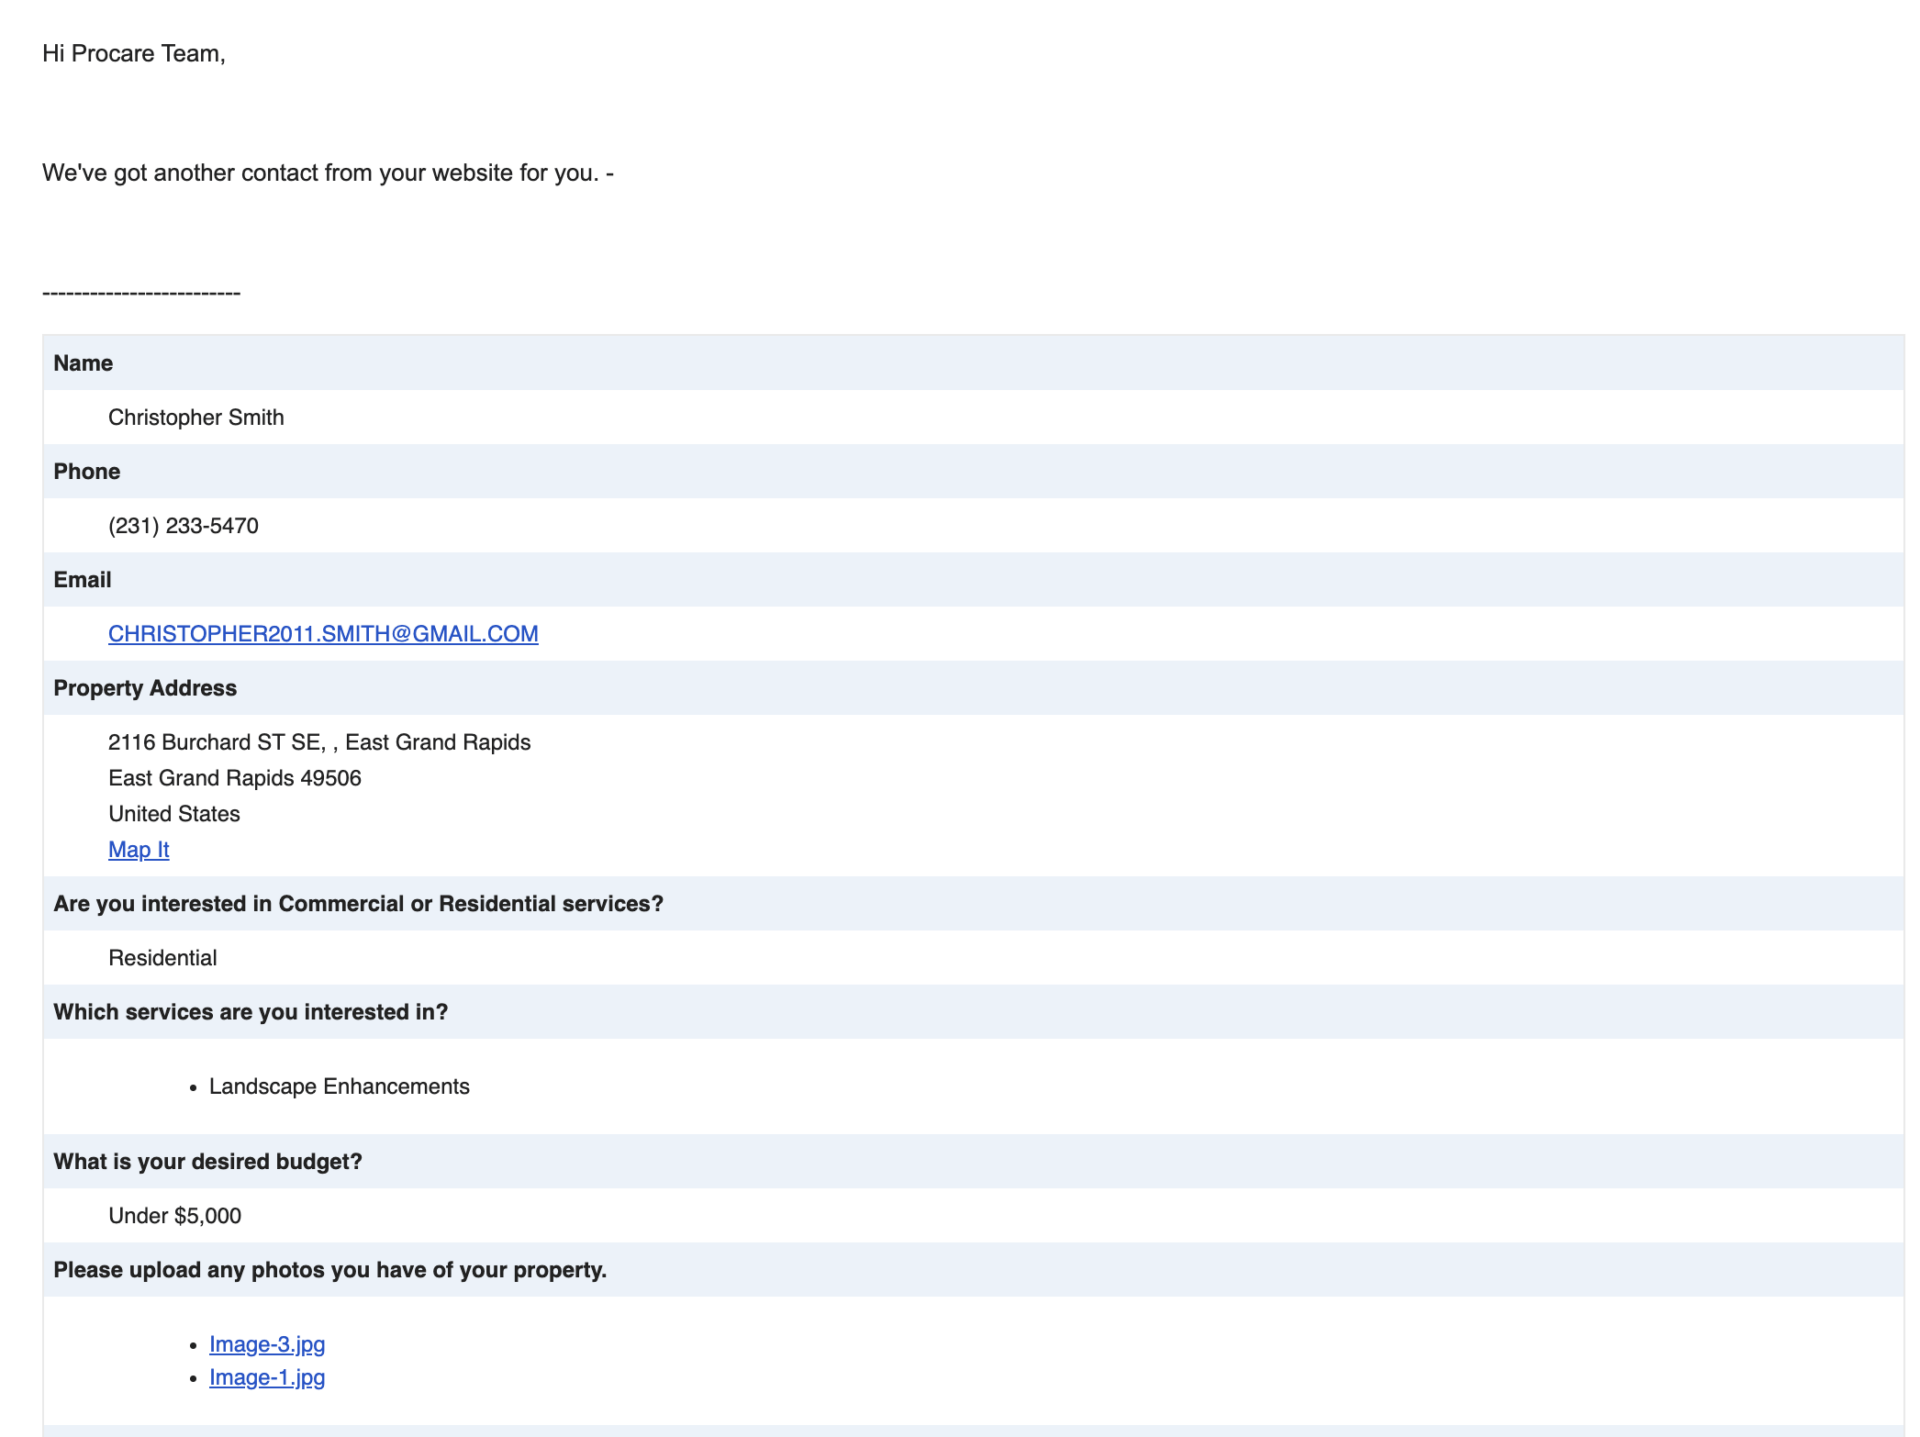
We do not want to be including attachments, because this will adjust the file size requirements we can provide.
The current method includes links to the files uploaded, allowing us greater flexibility for user uploads.
Unique Form Notifications
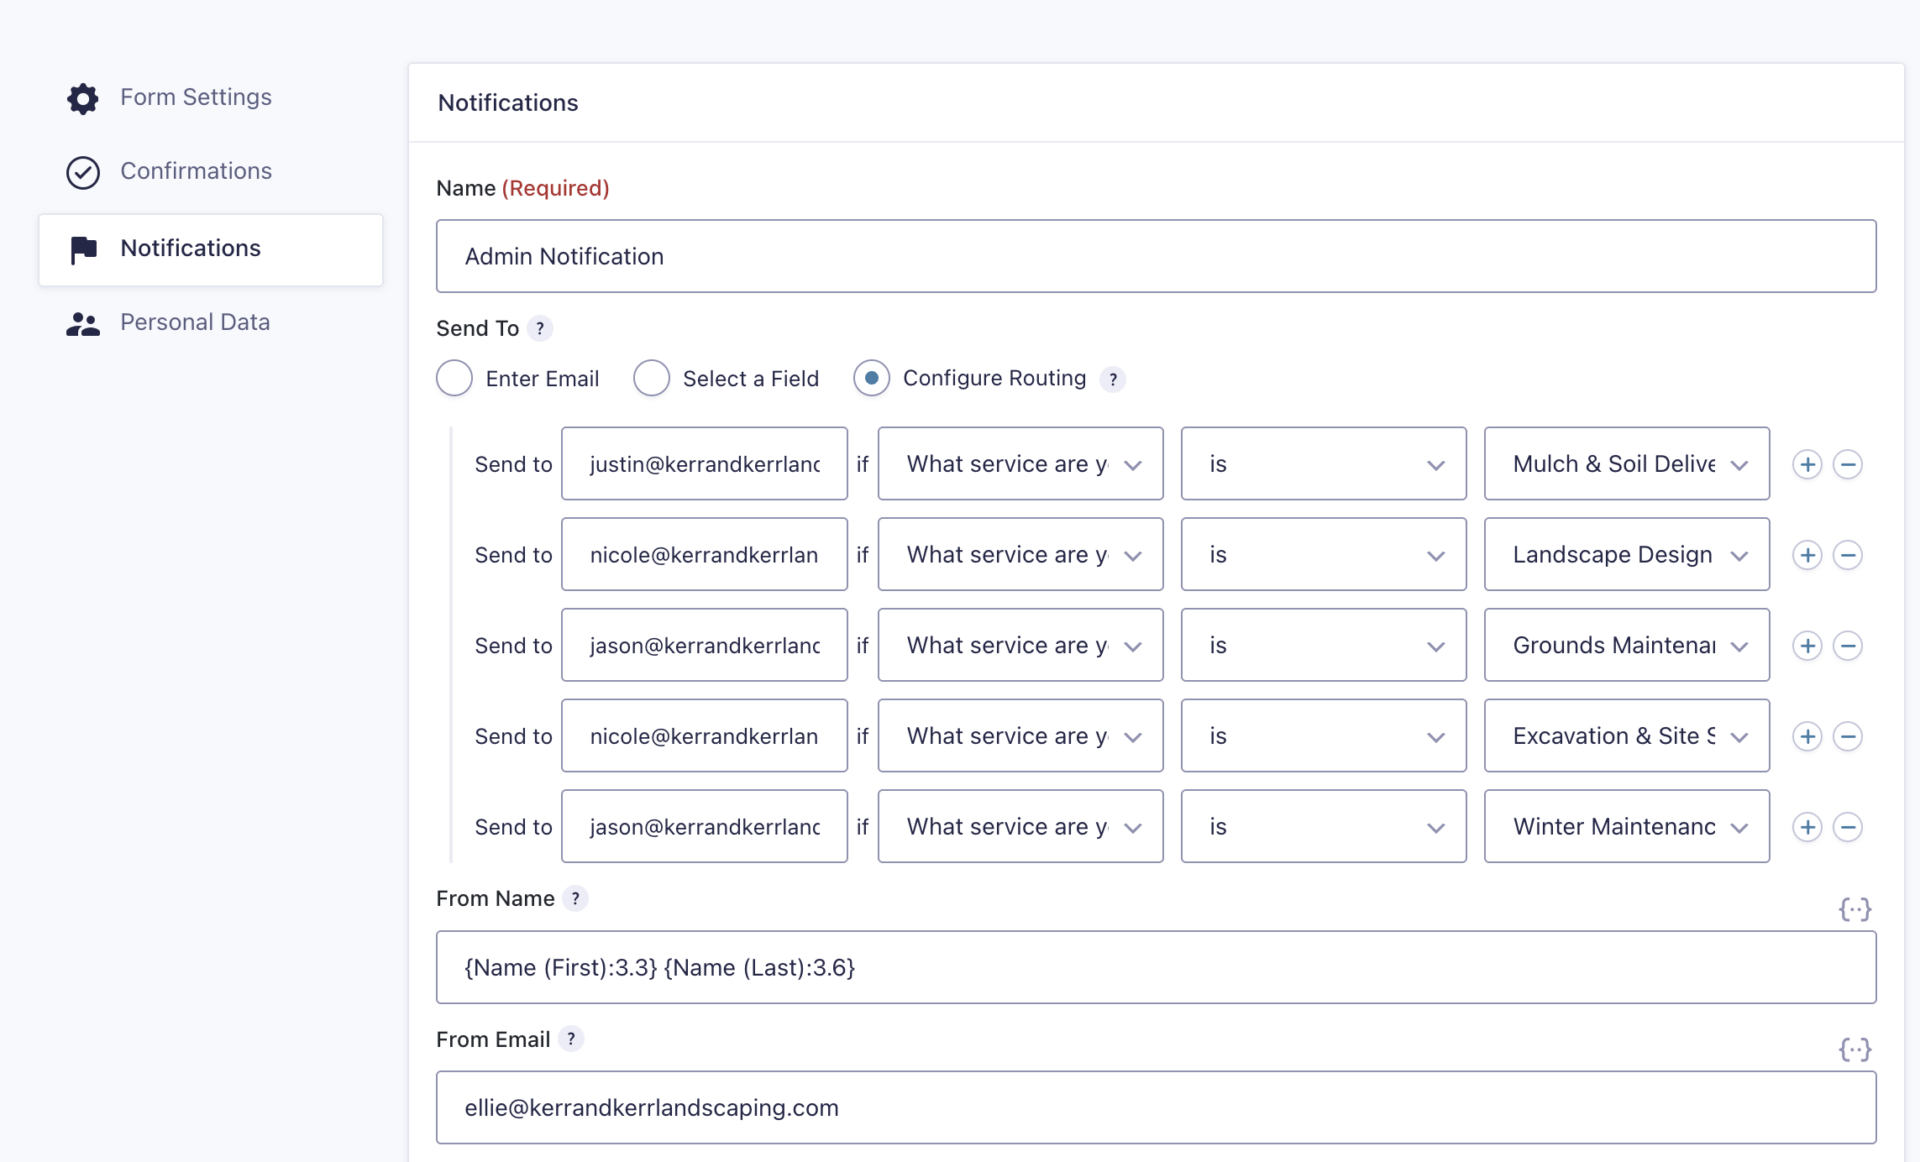
Very rarely, clients will have different departments who need to be notified depending on a selection from the form.
This can be done via Configure Routing, but should only be done in extreme cases where no other option is acceptable.
Testing Form Notifications
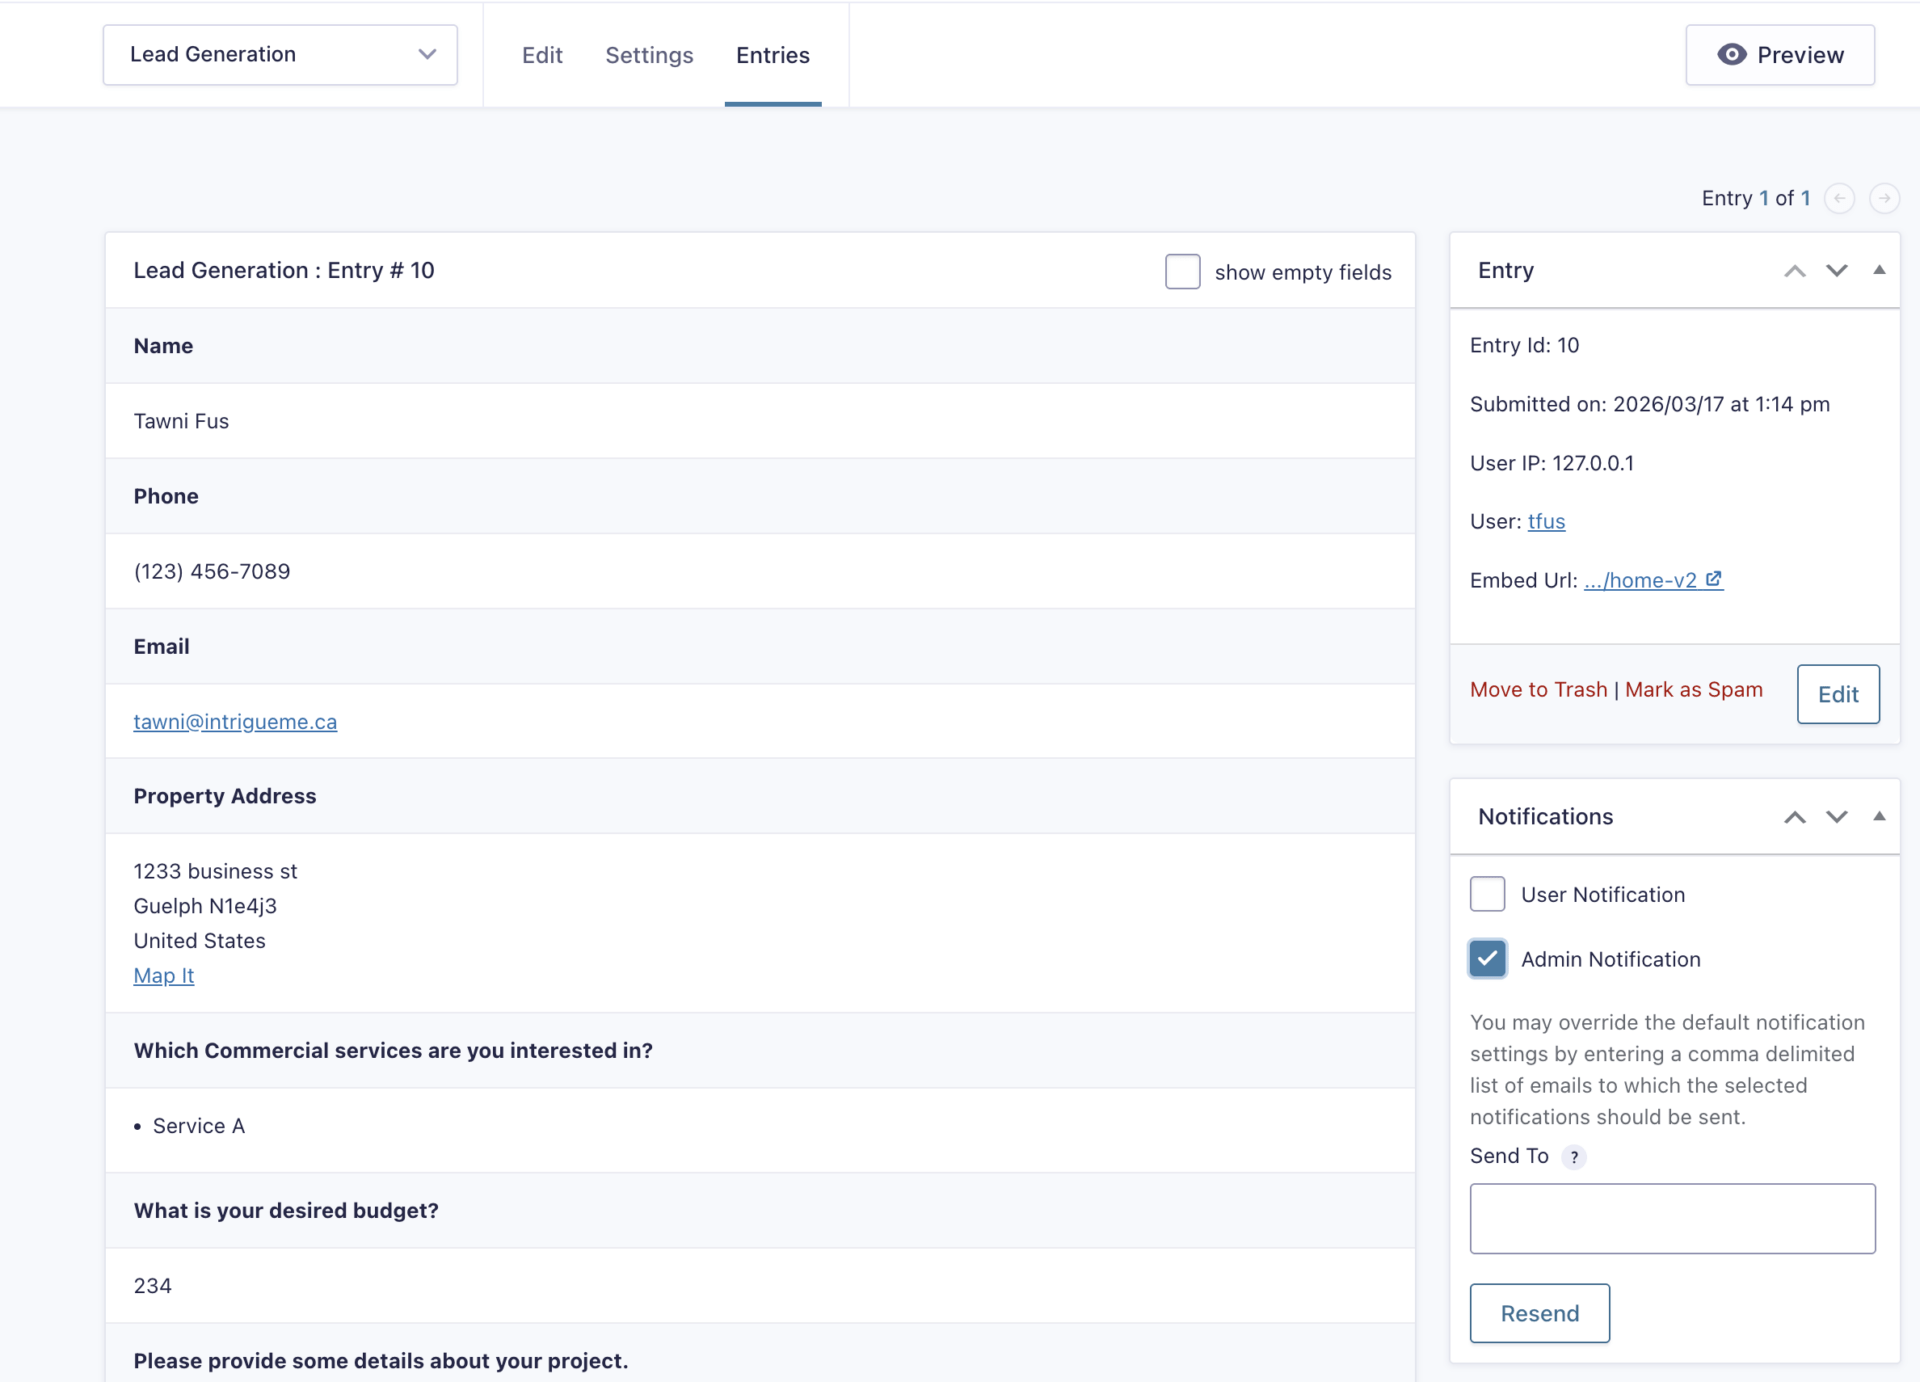
In the Entries tab of a previously submitted form, you can go into a particular entry, and under Notifications on the right-hand sidebar, you can check one of the emails that would have been sent, and send to your desired email address in order to test what the recipient received.
This can be beneficial to test admin notifications to ensure the client is receiving clean data. If the site is live, having issues, or you want to see what’s being seen, this method is a great way to test and check on the data.
If a client flags not receiving a notification, you can use this same method to test by not including a unique email to send to, and confirm with the client if they then received it.